Creating Flex Components - the easy way (for Flash IDE converts)
I’m sure I’m not the only one that wants to make use of their existing skills in Flash to create Flex components without getting bogged down by creating it all in ActionScript classes, overriding lots of methods and generally getting in a mess. Don’t get me wrong, learning how to code custom components is something I want to learn but for now, I want something quick.
I came across this post by Serge Jespers; a brilliant video for getting started. However, I wanted my components to be scalable like other Flex components, and after some digging around I found that by overriding the method setActualSize() I could get my components to react to being scaled by its layout container. The setActualSize() method on a component is called by its layout containers’ updateDisplayList() method, so when we make changes to the size of the layout container (i.e. resize the window) the changes are reflected in the component, in Design view.
In the explanations below I’ll be assuming you already have an understanding of the Flash IDE (in this case CS3), creating custom classes and have the Flex Component Kit for Flash installed.
Before we get started, you can;
Download the Flash CS3 source files [Zip file: 151Kb]
Download the sample Flex project archive [Flex Project (Zip file): 41Kb]
Creating the component in Flash
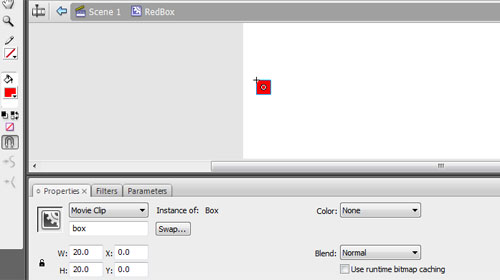
If you look at the image below I’ve created a red box with the instance name of box in a MovieClip called RedBox. This is the basis of the component we will create; the aim is for the component to keep the red box centered when it is resized.
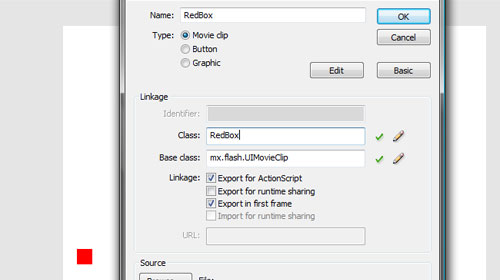
If you select the RedBox MovieClip in your library and go to Commands > Convert Symbol to Flex Component this will now, amongst other things, set the Flash file to produce a swc file when published, which you will later use in Flex, and added the FlexComponentBase to your library.
You may receive an alert asking you if you wish to change the frame rate of your Flash file to 24fps, it is recommended to do this. The properties of the RedBox MovieClip should look the same as the image below. Note that the MovieClip now has a base class of mx.flash.UIMovieClip, this is the base class we will extend for our custom component.
The MovieClip is ready for use in Flex as a component, but if you try to do so it won’t perform as we want it to when it’s scaled. We will use the class below to do this, before we move on there’s a couple of things to note about the class.
- We need to import the MovieClip class because it’s used in the component (the instance called box is still a MovieClip). If you have other objects in your component ensure these are imported.
- The class extends mx.flash.UIMovieClip, this is the base class the Flex Component kit gave the class initially.
- We’ve overridden the setActualSize() method so that we control what happens when the component is resized. Firstly we check to ensure that it’s necessary we change properties of the children in the component, if the new dimensions do not match the current dimensions then we change them and adjust the children (in this case our box).
package couk.psyked.ui
{
import flash.display.MovieClip;
import mx.flash.UIMovieClip;
//
public class RedBox extends UIMovieClip
{
public function RedBox():void
{
super();
}
//
override public function setActualSize( newWidth:Number, newHeight:Number ):void
{
if (newWidth != _width || newHeight != _height)
{
_width = newWidth;
_height = newHeight;
//
box.x = ( _width - box.width ) / 2;
box.y = ( _height - box.height ) / 2;
}
}
}
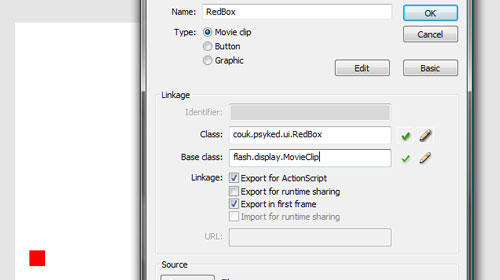
}Finally we need to change the linkage of our RedBox MovieClip in the library, set those to the image below. Note that we change the base class to flash.display.MovieClip; this is because it’s ignored now that our custom class extends mx.flash.UIMovieClip. If you try to link the custom class to the MovieClip without changing the base class you’ll get an error.
That’s it, publish the file and it’s ready to drop into Flex.
Using the component in Flex
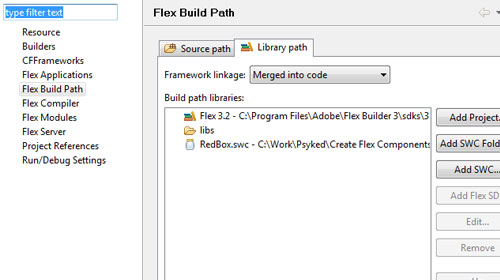
Create a new project in Flex, I’ll be using a new Web application, and add the swc file to the library path of the project (it’ll be the same name as the fla). Your Flex Build Path properties should look similar to the image below.
In the application tag of your mxml file you need to add the following attribute xmlns:ui=“couk.psyked.ui.*” this will enable you to use the custom component and give you code hinting for it. If you’re not sure what this attribute does then you might want to look up xml namespaces.
Now you can use the component as you would any other Flex Component, start typing “<Red” and you should see ui:RedBox in the code completion list. In the example below I’ve used the component twice in a VBox, once setting both the width and height to 100% and the other one has the height specified. If you run this web application in the browser and play with the window size you will see the red boxes stay in the center of their component.
View the published web application
You can download the source files below; this includes the files used in both Flash and Flex.
Download the Flash CS3 source files [Zip file: 151Kb]
Download the sample Flex project archive [Flex Project (Zip file): 41Kb]
Final comments
As I mentioned before, this is a quick implementation of creating a Flex Component using Flash. If anyone has any improvements, cool uses, suggestions or comments on this method please leave a comment – even if it’s just to say you used it!